Original Kit:
1958 Cadillac Fleetwood
Made By:
Jo-Han (promo)
Scale:
1/25

Other Cadillac Models
Elvis ‘56 Eldorado (Review)
Ghostbusters Ecto-1 (Review)
Nightmare on Elm St ‘58 S.62
Ghostbusters: The Video Game Ecto-1B
ZZ Top CadZZilla
Nightmare on Elm St ‘58 S.62 (Review)
Elvis ‘55 Fleetwood (Review)
Ghostbusters 2 Ecto-1A
The Godfather ‘55 Fleetwood (Review)
‘63 Series 62 (Review)
3000 Miles to Graceland ‘59 CDV
‘83 Presidential Limo (Review)
‘38 Presidential Limo (Review)
The Real Ghostbusters Ecto-1
Other Paranormal Models
Christine (Review)
Ghostbusters Ecto-1 (Review)
Ghostbusters 2 Ecto-1A
Ghostbusters Ecto-1
Stranger Things Chevy Blazer (Review)
Night Watch Audi TT
The Real Ghostbusters Ecto-1
Supernatural Impala
The Car
Ghostbusters: The Video Game Ecto-1B
Wheels of Terror Charger
Blade ‘68 Charger
Haunted Mansion Hearse (Review) Nightmare on Elm St Cadillac (Review)
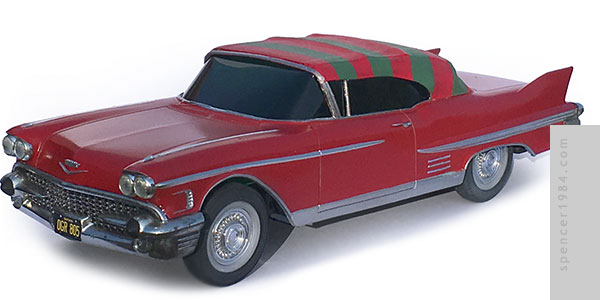
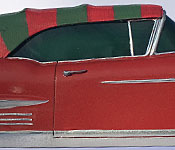
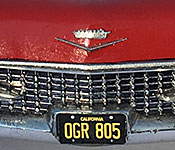
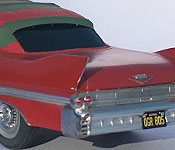
When I first went into this project, I wasn't sure if my idea could actually work. Models of the '58 Series 62 convertible simply don't exist, and the closest thing that had ever been made was a Johan promo of the 4-door Fleetwood hardtop. Doing the conversion would have been tricky but by no means impossible. The real tricky part was that after 60 years these promos tended to take on new and interesting shapes...so before I could even hope to make a convertible I had to see if I could straighten the body.
There have been numerous suggestions for straightening these bodies posited over the years, each with the disclaimer of "results may vary." The most common of these were mild focused heat and cutting the plastic to relieve stress, so after disassembly and a good cleaning that was where I started.
First I cut several pie wedges out from the front of the hood, where the worst of the warping had occurred. I also relieved the underside of the hood with the Dremel, so hat it would (hopefully) be more likely to flex rather than crack. I applied heat over the center front of the car, working slowly and carefully, putting pressure on the body to try to get it reshaped. This worked to a degree, but needed a little extra mechanical help it not re-warp. So I drilled holes behind where the headlights would be mounted, and inserted a U-shaped stainless steel rod that both pulled the fenders together and pushed up on the hood, keeping the parts more correctly aligned. This rod and the underside of the hood was thoroughly coated with epoxy, both to provide strength and to create a barrier layer to help avoid future warping.
To straighten out the sides, I first glued a tube from side to side in front of the rear wheels, which was where it was most pinched. This pushed that area out, but also pushed the front wheel openings too wide. So I drilled small holes in the rockers just behind the front wheels and inserted a section of guitar wire to pull those corners back in. This same technique was used at the very rear of the car, where the body had splayed out ahead of the rear bumper. To try to keep things aligned, I epoxied a section of brass tube down each side of the car near the bottoms of the doors.
With the body now more or less straight, it was time to make it a convertible. I sanded off the fleetwood trim, scribed in new door lines, and filled the old door seams with Tamiya putty. The rear fender openings were cut using the skirt seams a a guide, then the lips were made from wire shaped and glued into place. I wanted to have the top up since it had the iconic red-and-green striping, so I added wire across the surface of the roof to simulate the ribs and made the top itself out of gaffer's tape.
Once modifications were done, I painted the car Krylon Banner Red and painted the top using acrylic craft paints. Trim was done using a combination of Molotow Liquid Chrome, BMF, and aluminum tape. I considered redoing the bumpers, but after I washed them off I decided I liked the patina too much to get rid of it (not only did it look good, it perfectly suited the movie's assertion that this was a teenager's used car rather than a show vehicle). So instead I weathered the rest of the car to match, including a set of wheels and tires from Polar Lights' Ecto-1. The hood and trunk badges were something I drew up and had 3D printed at Shapeways, then painted with more Liquid Chrome.
The interior was warped even worse than the body, so I decided to go with darkly tinted windows and leave it out altogether. A piece of art by Bradley Knickerbocker gave Freddy's Caddy green tinted windows, and it seemed so fitting that I used that here (just quite a bit darker so the missing interior wasn't a problem). The windshield and side windows were all-new parts thanks to how bad the originals were, but the back window was acting as a support structure for the top so that was laminated over the existing plastic.
The finished result isn't a show winner by any stretch of the imagination, but I'm still pretty happy considering what I had to start out with. I consider it a successful test of some new techniques that I've never tried before, and if I ever have to do something like this again I'll have a much better idea of how to get it done.