Original Kit:
Nana Okada's Celica
Made By:
Aoshima (kit #40553)
Scale:
1/24

Other Comic & Manga Models

Transformers G1 Prowl
DC Bombshells Wonder Woman (Review)
Over Rev! Toyota MR2
The Circuit Wolf BMW 3.0 CSL
Jigoro Jigorou Toyota Celica
Detective Comics #597 Batmobile
Ctrl-Alt-Del Zeke
Deadpool Taco Truck (Review)
Cyber Formula SIN Ogre AN-21 (Review)
Detective Comics #156 Batmobile
Avengers Chevy Camaro (Review)
Cyber Formula Asurada AKF-11 (Review)
Detective Comics #400 Batmobile
Cyber Formula SIN Asurada (Review)
Garfield Beach Car (Review)
It's Walky! 1986 Dodge Ram 50
Misery Machine
Lupin III Mercedes-Benz SSK (Review)
The Circuit Wolf Lotus Europa
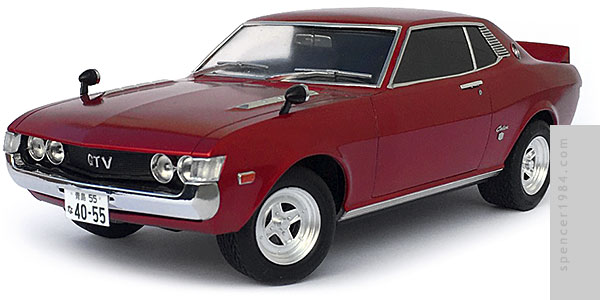
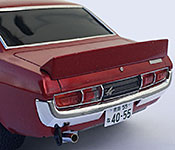
This was supposed to be a straightforward box stock build of Aoshima's Jigoro Jigorou Celica kit, but ended up being one of those builds where if something could go wrong, it did.
The first problem I hit was also the first part of the build I attempted, painting the body. I wanted something a little more interesting than the straight red used for the promotional builds, so I tried Model Master's Panther Pink. It was much brighter than I anticipated, so I shelved the paint and attempted to strip the body to start over. No such luck, though, and the plastic had a bad reaction to the stripper rendering it useless for this project (it would be better suited as a post-apocalyptic car). At that point I set the whole thing aside until I happened to come across a later reissue of the same kit at a really good price. Not only did this give me a clean body, the newer version also included photoetched details for the chrome trim.
Still wanting something a little fancier than "red," I decided to try Tamiya's TS-39 Mica Red. I started with a base of gray primer, but that wasn't covering the plastic sufficiently and there was a distinct tone shift between the white cast body and the red cast spoiler. So I switched to black primer, which covered everything just fine. But when I tried spraying the Mica Red, I found it was a translucent color, more like a candy color than a typical color coat. So I grabbed the closest "bright" base color I had, the Tamiya TS-88 Titanium Silver left over from my Misfile BMW. The Mica Red went over that beautifully, but had much more of an orange/copper look than I had hoped. At this point I was a half hour into painting and was starting to think that this was going to be another dud paint job. With essentially nothing to lose, I used Tamiya's TS-74 Clear Red instead of my usual gloss clear, and...it worked. All of a sudden, the near-random layering of paints produced the exact candy red I was looking for. Sometimes it’s better to be lucky than good.
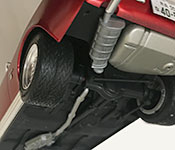
With the body finally looking the way I wanted, I set it aside to fully gas out and started in on the rest of the kit. Assembly was straightforward but not exactly simple, with a surprising number of parts. Despite it being a curbside and having the infrastructure in place to add an electric motor, it had a fully detailed chassis with a multi-part exhaust and fully functional suspension system. The instructions weren't as clear on how to assemble the springs as I would have liked, but doing a dry parts fit showed that there was really only one way to put things together so my compliments to Aoshima's engineers.
Inside, I used the optional racing bucket for the driver's seat and added flocking to the floor to create a nice deep pile carpet. Aoshima tried something different with their gauge cluster, casting the numbers and needles as part of the clear faces. It was an interesting concept, but I didn't care for the way they looked after painting, so I replaced them with some silver gauge decals by Slixx. Silver paint was also used for the multi-part aftermarket stereo system and a few chrome accents, otherwise the interior was painted satin black.
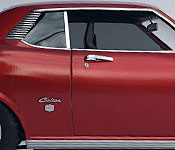
Once the body was solid enough to handle, I added the window trim using BMF and painted the window gaskets and grille area black. This kit had separate bezels to fit over the headlights and taillights, which made painting and trimming super easy but required a fair bit of patience to get everything lined up. Molotow Liquid Chrome was used for the taillight bezels and to touch up any lost chrome at sprue connection points like on the trailing edges of the door handles. The kit grille was different from what appeared in the manga, so I cut out the middle and replaced it with fine open mesh. The GTV in the center was made by cutting apart and rearranging the parts of a chrome Toyota badge. The windows were tinted by combining tinted plastic and paint, so they got progressively darker as they went back (clear for the windshield to nearly opaque for the rear window). Along with the new body and badges, the replacement kit also donated its rear bumper since the original one broke as I was trying to clean up the sprue attachment point at one end. The final detail is a set of custom license plates, made in the same vein as the Shakotan★Boogie Celsior: "Aoshima" prefecture with the kit number.